Check Other Email Addresses BlueLight Internet members can check and edit up to three external POP accounts. To Check Other Email Addresses: - Click the Email Features link within Email on the Web.
- From the Email Features page, click the link to Send and Receive from other Email addresses.
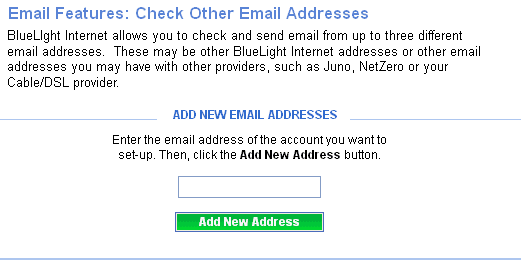
- Add the email address of the other account you would like to add.
- Click Add New Address.
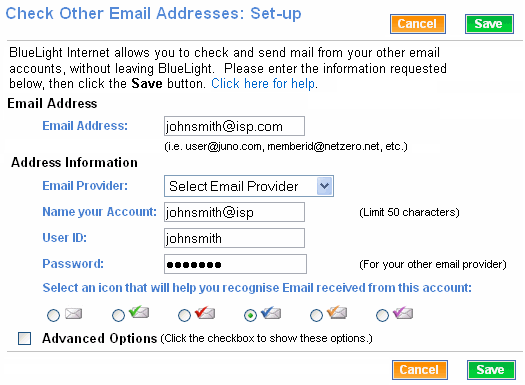
 - Enter the additional email address in the Email Address section.
- Select your Email Provider from the drop-down list.
- Enter the name you would like to have for your account. The limit is 50 characters.
- Enter your user ID in the User ID section. This is usually the text before the @ in your email address, though it may vary. Check with your email provider for details.
- Enter your password in the Password section.
- Select an Icon that will help you recognize mail that is sent to that account.
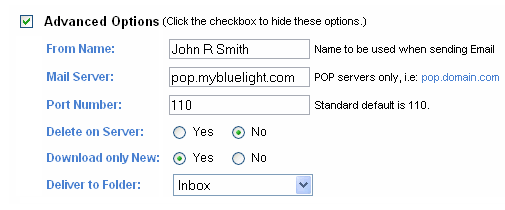
 There are Email Features available to help distinguish email from this additional account available for your use. Check Advanced Options to display:  - Enter the name you would like to appear when sending email in the From Name section.
- Enter your incoming POP address in the Mail Server section (such as pop.mybluelight.com).
Note: The Mail Server name can vary from service to service. Some email providers use the format mail.[service].com while others use pop.[service].com - Some free email providers, such as Hotmail or Yahoo, may only offer external POP access to members who pay for their premium service. Please consult your email service provider or visit their Web site for more information about accessing their POP email externally. - If you know your Port number, enter it in the Port Number section. Otherwise, leave it at 110.
- If you want incoming external messages permanently deleted from the POP mail server, click the dot next to Yes under Delete on Server. Otherwise, leave it at No.
- If you want to only receive only new messages from your external POP account, click the dot next to Yes under Download only New. Otherwise, leave it at No.
- If you want incoming external messages delivered to a folder other than the Inbox, specify a different folder in the dropdown next to Deliver to Folder.
- Click Save to save your new External email address settings, or Cancel to cancel.
- Your new account will appear on the left side, underneath Check BlueLight Mail.
To edit the settings for an external POP Account: - Click the Email Features link within Email on the Web.
- From the Email Features page, click the link to Send and Receive from other Email addresses.
- Select the account from the dropdown list.
- Edit the entry as needed. Click Save to save your new External POP account settings, or Cancel to cancel.
To remove an external POP Account: - Click the Email Features link within Email on the Web.
- From the Email Features page, click the link to Send and Receive from other Email addresses.
- Select the account from the dropdown list.
- Click Delete.
Back to the Main Menu
| |
