Common Connection Errors / Solutions I can't obtain a stable connection with BlueLight Internet If you are experiencing problems maintaining a stable connection with BlueLight Internet, the following information should help you to resolve the issue.
A. Change your access numbers Change access numbers and verify your dialing preferences Sometimes a bad access number may prevent you from making a successful connection. Pay special attention to the number listed on your BLTV screen during the connection process. If your connection fails after dialing the first access number, try removing that number from your selected list of access numbers and add other numbers that are local to you. Also, verify your dialing preferences. WARNING: THE USE OF SOME TELEPHONE ACCESS NUMBERS MAY RESULT IN LONG DISTANCE CHARGES. IN SELECTING YOUR ACCESS NUMBER(S), PLEASE NOTE THAT ALTHOUGH AN ACCESS NUMBER MAY BE IN YOUR AREA CODE OR LOCATED IN YOUR GENERAL GEOGRAPHIC REGION, IT MAY NOT NECESSARILY BE A LOCAL NUMBER FOR YOU. YOU MAY INCUR SUBSTANTIAL TELEPHONE CHARGES IF YOU CHOOSE ACCESS NUMBERS THAT ARE NOT COVERED BY YOUR LOCAL CALLING PLAN. WE URGE YOU TO CHECK WITH YOUR TELEPHONE COMPANY TO FIND OUT WHICH NUMBERS ARE LOCAL FOR YOU BEFORE USING A NUMBER FROM THIS LIST. To change access numbers and verify your dialing preferences: - Double-click the BlueLight Internet icon.
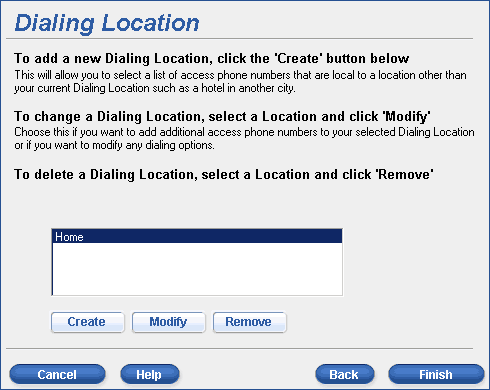
- Click Settings on the Welcome screen and then click Locations.
- Select your location (e.g. Home) and click Modify.

- On the Set-Up a Dialing Location screen, verify the number of the telephone line connected to your computer. Do not turn off call waiting unless you have it enabled/active on your telephone line.
- Click Continue.
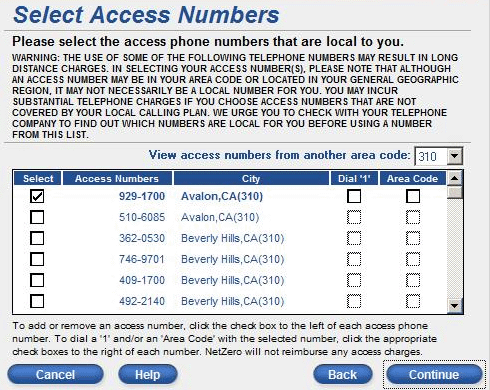
- The next screen allows you to select local access numbers. Check all the local numbers available to you. If you dial 10-digits to reach someone within the same area-code, check the Area Code box for each selected access number. If you dial 11-digits to reach someone within the same area-code, check the Dial 1 and Area Code boxes for each selected access number.

- Click Continue and then click Finish to proceed to the logon screen.
- Retry the BlueLight Internet connection.

B. Do you have Call Waiting? Verify your Call Waiting Settings - Double-click the BlueLight Internet icon on your Desktop.
- Click Settings on the Welcome screen and then click Locations.
- On the Dialing Location screen, highlight your preferred location (i.e. Home) and click Modify.

- On the Set-Up a Dialing Location screen, select whether to enable or disable Call Waiting by choosing the answer to question Do you want to turn off call waiting? and then click Continue.

- By default, the code for disabling your call waiting is set at *70. If you do not know the code, contact your phone company.
- Click Continue again and then click Finish to save your settings.
Note: If you do not have the call waiting service activated on your phone line, do not answer Yes to Do you want to turn off call waiting? 
C. Change your modem settings Windows 98/ME Users: - Click the Windows Start button, point to Settings and select Control Panel.
- Double-click Modems and click the Properties button.
- Set the speed for your modem from the Maximum Speed, menu. For 14.4 modems use 19200, for 28.8 modems use 38400 and for 56k use 57600.
- Make sure Only connect at this speed is not checked
- Select the Connection tab.
- Under Call Preferences, ensure that the box marked Cancel the call if not connected within is unchecked. Some modems may not allow you to change the call preferences.
- Click OK then click Close to exit.
- Retry your BlueLight Internet connection.
Windows XP/2000 Users: - Click the Windows Start button and select Control Panel.
Windows 2000 users: Click Settings and then Control Panel. - Double-click on the Phone and Modems icon.
Windows XP users: If you don't see this option, click Switch to Classic View after Step 1. - Select the Modems tab, highlight your modem and then click on the Properties button.
- Select the Modems tab, and set your modem speed from the Maximum Port Speed menu. For 14.4 modems use 19200, for 28.8 modems use 38400 and for 56k use 57600.
- Select the Advanced tab and click on Change Default Preferences.
- Under Call Preferences, change the value of the box marked Cancel the call if not connected within to 255. Some modems may not allow you to change the call preferences.
- Click OK three times to exit.
- Retry your BlueLight Internet connection.
Windows Vista Users: - Click the Windows Start button and select Control Panel.
- Click on Hardware and Sound and then click on the Device Manager link.
- Double-click on Modems or click on the '+' sign next to Modems.
- Right-click on your modem in the list and click on Properties.
- Click the Modems tab, and set your modem speed from the Maximum Port Speed menu. For 14.4 modems use 19200, for 28.8 modems use 38400 and for 56k use 57600.
- Select the Advanced tab and click on Change Default Preferences.
- In General tab, under Call Preferences, change the value of the box marked Cancel the call if not connected within to 255. Some modems may not allow you to change the call preferences.
- Click OK and OK again to exit.
- Retry your BlueLight Internet connection.

D. Check your Internet connection settings - Click the Windows Start button and select Control Panel.
- Double-click the Internet Options icon.
- Select the Connections tab.
- Check the circle next to Never Dial a Connection.
- Click Apply then click OK.
- Close the Control Panel.

| |
