Common Connection Errors / Solutions Error 731: Protocol Not Configured Runtime error 731 is a common connection error that occurs when your computer cannot establish a connection. This may leave the computer or modem in an irresolvable state; therefore, future connection attempts are not going to work as expected. To correct this error, you must first attempt to re-boot your computer. If that fails, we will guide you through additional steps. How to Re-Boot Your Computer and Modem - Save all unsaved work and close all programs.
- Click on the Windows Start button and select Shut Down.
- Check the circle next to Restart and click OK.
- If you have an external modem, turn the power off then back on. If there is no on/off switch on the modem, you may have to un/replug the modem's power supply.
- Once the computer has finished booting up, try connecting to BlueLight Internet once again.
- If you still receive this error message, please follow the instructions below to configure Windows network components for DUN and modify your system settings.
Check Network Settings  - On your desktop, double-click the My Computer icon.
 - Double-click the Control Panel icon.
 - Double-click the Network icon.
IMPORTANT! Before making any changes to your Network settings, please ensure that you have your Windows CD.
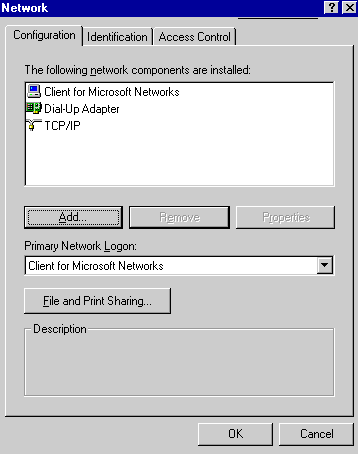 - Double-click TCP/IP->Dial-Up Adapter.
Note: If you get a TCP/IP Properties Information window, click OK.
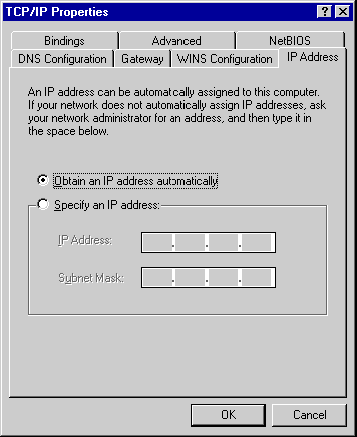 - Ensure that only the circle next to Obtain an IP address automatically is checked.
- Select the WINS Configuration tab.
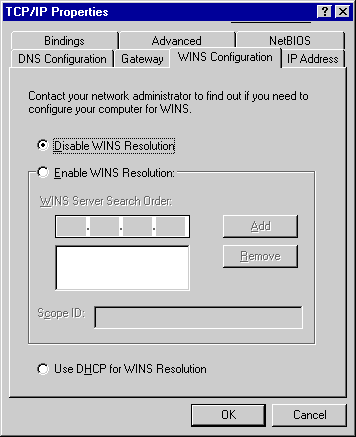 - Ensure that only the circle next to Disable WINS Resolution is checked.
- Select the Gateway tab.
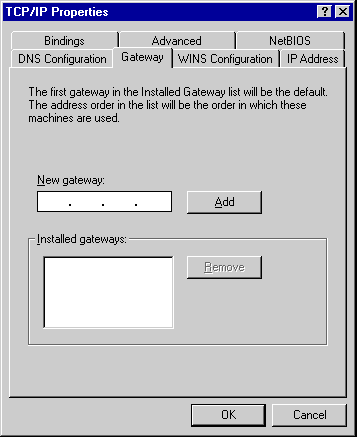 - Ensure that all the fields are blank.
- Select the DNS Configuration tab.
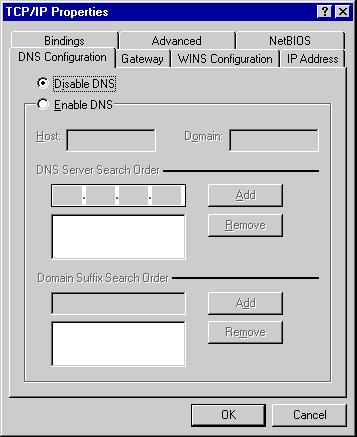 - Ensure that the circle next to Disable DNS is checked.
- Select the Bindings tab.
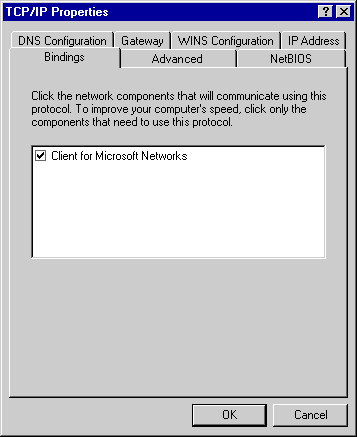 - Ensure that only Client for Microsoft Networks is checked.
- Select the Advanced tab.
 - Ensure that None is in the Property field.
- Select the NetBIOS tab.
 - No changes are necessary.
- Click OK.
- Click OK to exit.
Removing / Adding Network Components WARNING!The following instructions are for those systems that are not on a Local Area Network (LAN). If you are on a LAN and follow these directions, you may create a conflict that will disrupt your computer's connection to your LAN. Please contact your network administrator for assistance before you continue making any changes to the system configuration. To begin, close any active connections as well as any other programs you may have open on your system. - Click on the Windows Start button.
- Point to Settings and select Control Panel.
- Double-click the Network icon.
There will be a number of network components in the configuration tab. To eliminate the possibility of file corruption or misconfigured settings, we recommend that you remove and reinstall the three components listed below: - Client for Microsoft Networks
- TCP/IP
- Dial-Up Adapter
- Highlight the first component in the list and select Remove.
Note: If you are on a LAN (Local Area Network), do not remove the network adaptors and protocols. Please contact your administrator for instructions. If you use AOL, do not remove AOL Adaptor or TCP/IP.
- Repeat Step 4 until the three components listed above are removed.
- Click OK.
- If prompted to Restart the System, click No.
- Highlight TCP/IP>Dial-Up Adapter and click on the Add button.
- Highlight Client for Microsoft Networks and click on the Add button.
- At this point you should be back in Control Panel.
- Restart your computer and try your BlueLight Internet connection again.
- If your connection fails, complete the following steps to completely uninstall and reinstall Microsoft Dial-up Networking (DUN).
Uninstalling / Reinstalling Windows Dial-Up Networking (DUN)
Note: Before you begin, ensure that you have your Windows 95/98 CD-ROM or diskettes available and ready for installation. - Double-click the Add/Remove Programs icon.
 - Select the Windows Setup tab.
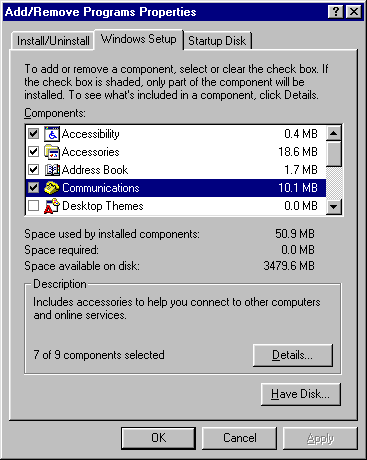 - Double-click on Communications.
 - Uncheck Dial-Up Networking.
- If prompted with a message about Dial-Up Networking being required by other components, click Yes.
- Click OK.
- When back at the Windows Setup tab click Apply.
- Double-click on Communications again.
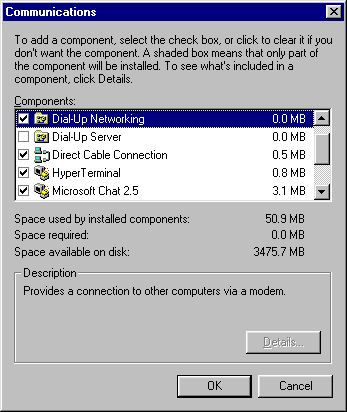 - Recheck Dial-Up Networking.
- Click OK.
- When back in the Windows Setup tab, click OK again to save the settings.
You may now be prompted for the Windows CD-Rom, or the file copy may begin automatically. If prompted for the Windows CD, insert the CD and click OK. If you are still prompted for it after clicking OK, verify that the drive letter listed in Copy files from is your CD-rom drive.
Note: If, during this process, you see a warning about "Version Conflict" or "A file being copied is older," click No. If you are prompted that the "file is not found," you are not using the CD-rom that was used to install Windows on your machine. During the File Copy, you may see a window asking you to enter a computer name and workgroup name. Click OK. You will see the Network Identification window: - For Computer name, enter your last name in all lower case.
- For Workgroup name, enter workgroup. Click Close.
- More files will be copied from your Windows installation media. When the File Copy is over you should be prompted with a message of System Settings Changed. Click OK.
- If prompted to restart the computer, click Yes.
- Retry the BlueLight Internet connection.
| |


